mNo edit summary Tag: Rich Text Editor: source mode |
EpicJoyBoy (talk | contribs) (wording; adding images) Tag: Rich Text Editor: source mode |
||
| Line 108: | Line 108: | ||
: PROFIT! |
: PROFIT! |
||
| ⚫ | |||
| ⚫ | |||
| ⚫ | Exported headshots from s3pe has |
||
| − | |||
| ⚫ | |||
| ⚫ | |||
| − | |||
| ⚫ | |||
| − | :Add a layer |
||
| − | |||
| ⚫ | |||
| − | :Move the layer so that it's below the sim's headshot |
||
| − | |||
| ⚫ | |||
| − | :Fill the layer with black (or any other color) |
||
| − | |||
| ⚫ | |||
| − | :Export the image and save as either .jpg or .png |
||
| − | |||
| − | ;Step 6 |
||
| − | :Voila! You can now upload the now black background headshot to the wiki. |
||
===How to take family pictures=== |
===How to take family pictures=== |
||
;Step 1 |
;Step 1 |
||
| Line 155: | Line 134: | ||
[[File:S4_Headshot_Tut4.png|thumb|left|200px|Note the blur surrounding the Sim. This may occur when exporting the file, yet not when copying the image.]] |
[[File:S4_Headshot_Tut4.png|thumb|left|200px|Note the blur surrounding the Sim. This may occur when exporting the file, yet not when copying the image.]] |
||
| − | |||
:;Step Five |
:;Step Five |
||
| Line 162: | Line 140: | ||
It may happen that choosing Export -> To File will not get a quality image. If this happens, right click on the image itself and choose Copy. Now the image can be pasted into an image-editing program and saved normally. |
It may happen that choosing Export -> To File will not get a quality image. If this happens, right click on the image itself and choose Copy. Now the image can be pasted into an image-editing program and saved normally. |
||
| ⚫ | |||
| ⚫ | |||
| ⚫ | |||
| ⚫ | |||
| ⚫ | |||
| + | This is also applicable for headshots exported through s4pe. |
||
| ⚫ | |||
| + | |||
| ⚫ | |||
| + | [[File:Making headshots black 1.png|thumb|225px]] |
||
| ⚫ | |||
| ⚫ | |||
| + | |||
| ⚫ | |||
| + | :Don't fill in the background just yet, because it won't look very nice. Instead, add a layer, and move the layer down so that it's below the background ''layer'' (the one that has the headshot). |
||
| + | [[File:Making headshots black 2.png|thumb|left|225px]] |
||
| ⚫ | |||
| + | :Fill the layer you just moved (It's more preferable to use black if you're intending to upload it to the wiki, but you can use any color you want) |
||
| + | |||
| + | [[File:Tariq Scott.png|thumb|The finished result!|125px]] |
||
| ⚫ | |||
| + | :Export the image and save as either .jpg or .png (if you intend to upload the headshot in question to the wiki, it's more preferable to select .png) |
||
| + | |||
| ⚫ | |||
| + | :''Voila!'' Feel free to upload the headshot in question to the wiki, or perhaps use it for your own purposes... |
||
{{DEFAULTSORT:Tutorial:Headshots of Sims}} |
{{DEFAULTSORT:Tutorial:Headshots of Sims}} |
||
{{Feat game guide|January 2013}} |
{{Feat game guide|January 2013}} |
||
Revision as of 07:59, 28 August 2015
This tutorial is only relevant to The Sims 2, The Sims 3 and The Sims 4.
This tutorial will tell you how to get those high-quality, amazing accurate headshots of Sims in The Sims 2, 3 and 4, commonly found on many articles on The Sims Wiki.
Please note that it's recommended you use .png for headshots as .png is lossless.
The Sims 2 Headshots
Here is how you can get headshots for The Sims 2.
- Step One
- Save your Sim or Pet and make sure that they are either in the family bin or moved in to a residence.
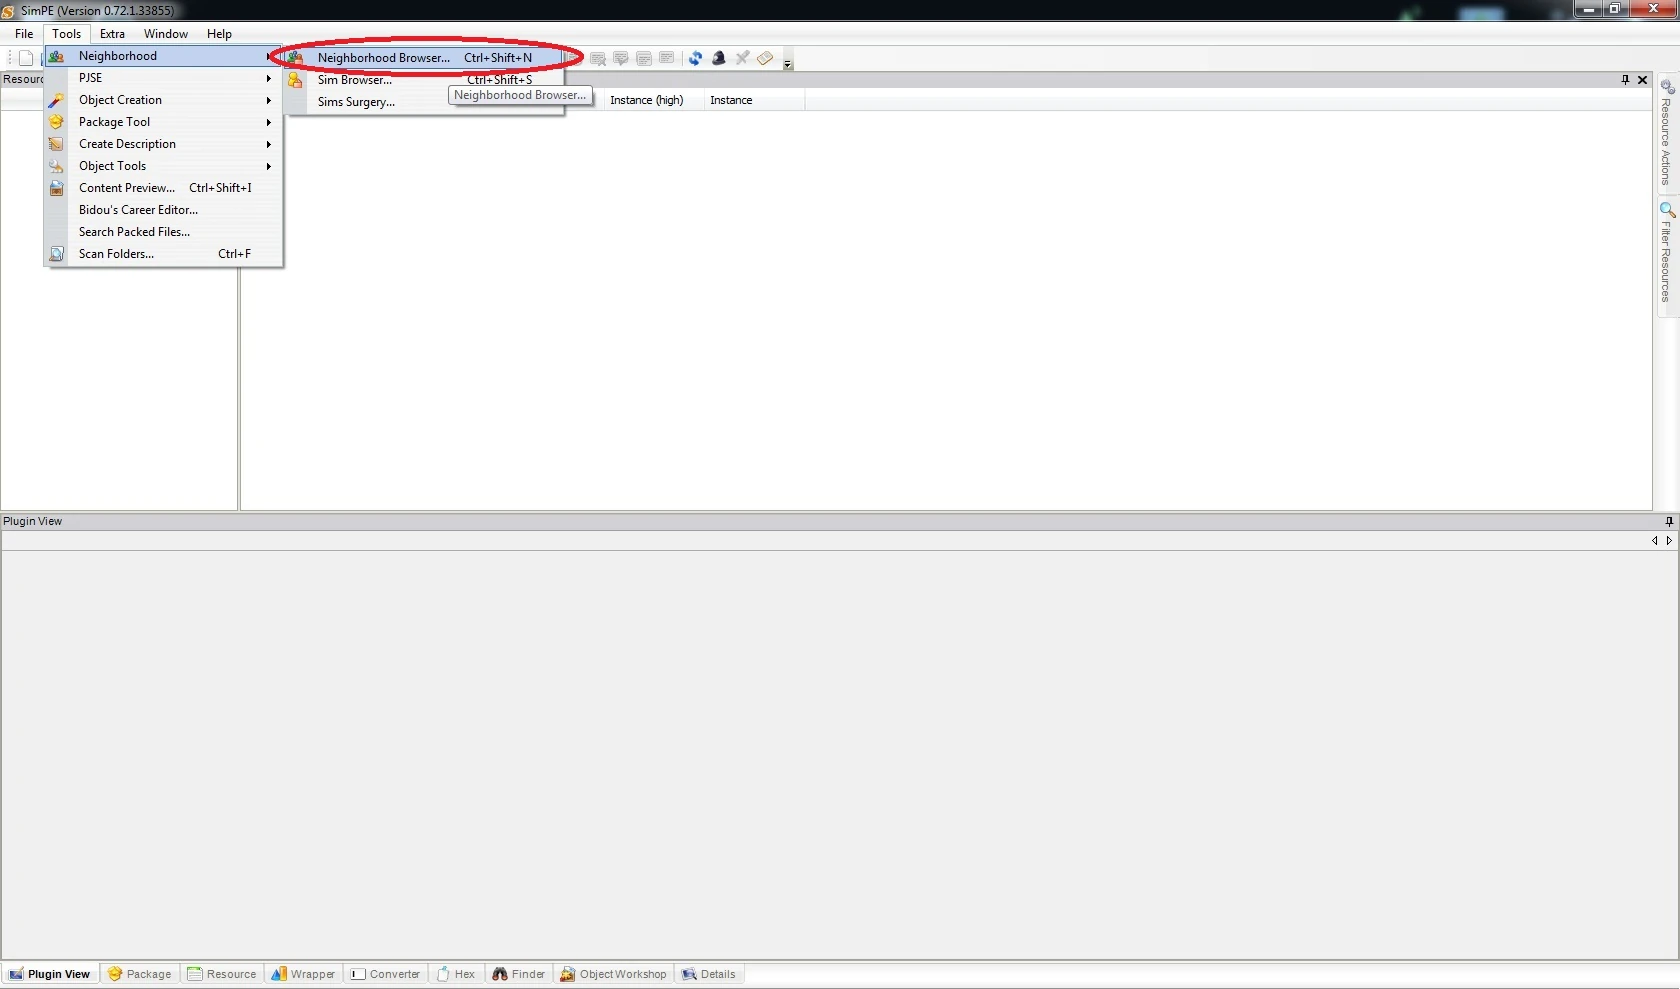

- Step Three
- Click on the Tools tab -> Neighborhood -> Neighborhood Browser. This can also be achieved by typing Ctrl+Shift+N.
- Step Four
- Select the neighborhood in which the desired Sim or Pet resides and click "Accept".

- Step Five
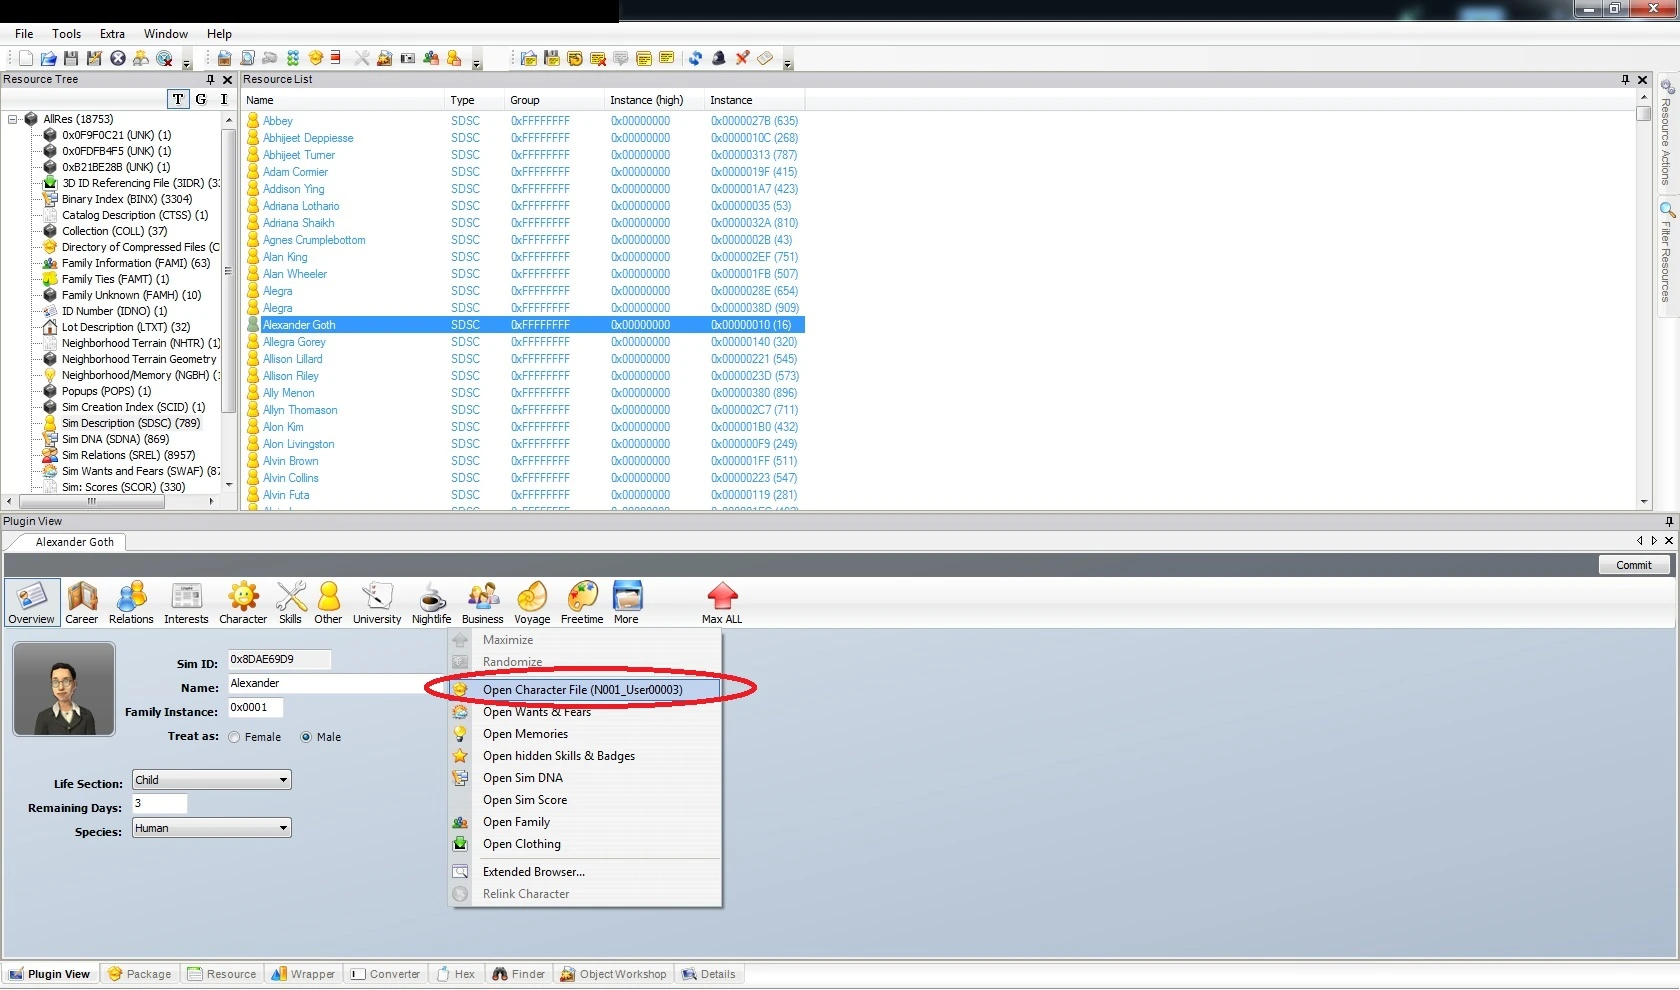
- From the Resource Tree (left-hand side of screen), click on "Sim Description" and find the desired Sim or Pet from the list.
- Step Six
- Select the More tab -> Open Character File from the Plugin View (bottom of screen)
- Step Seven

- From the Resource Tree, click on "jpg/tga/png Image" and select the image in the Resource List (there may be more that one image)
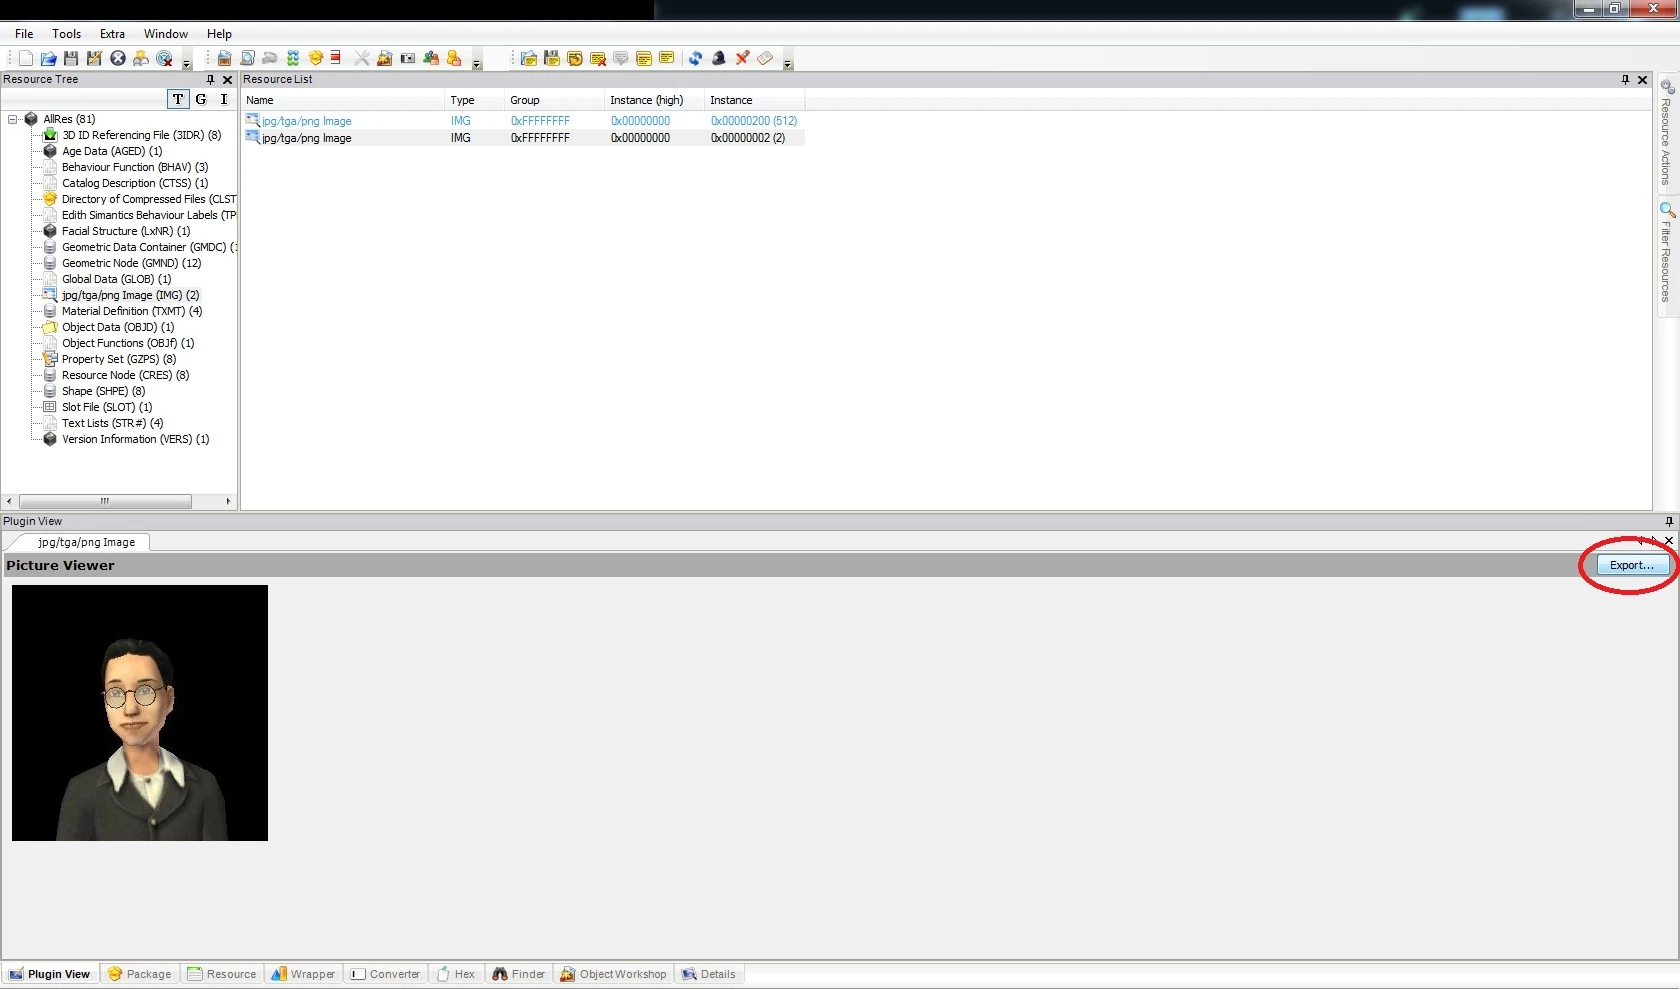
- Step Eight
- In the Picture Viewer, select "Export" on the right hand side, and save the picture in your folder.
Enjoy your headshots!
The Sims 3 Headshots
Here is how you can get headshots for The Sims 3.
Online Method
IMPORTANT!: You must have a Sims 3 account, if not please go here and register to get one: here
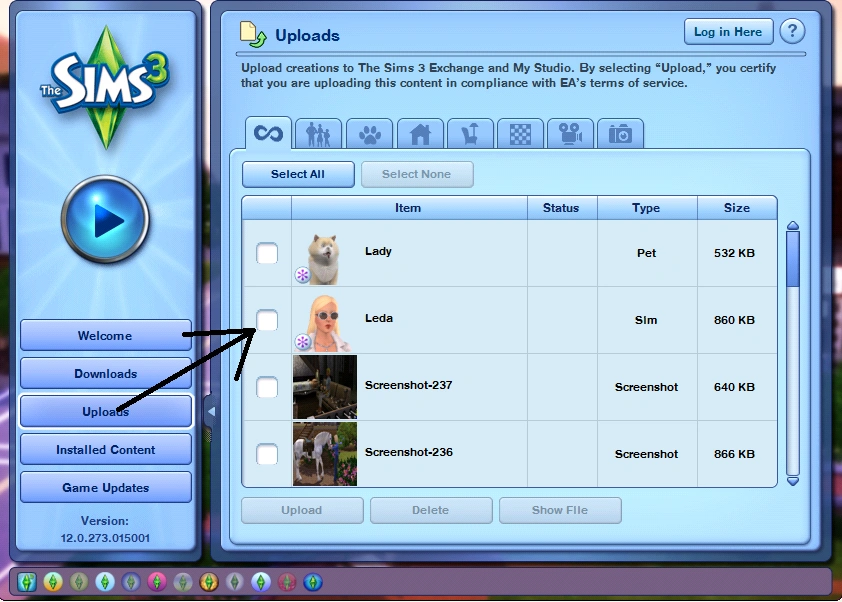
- Step One
- You want to make sure you are in CAS mode, here you will find the button to save and upload that Sim.
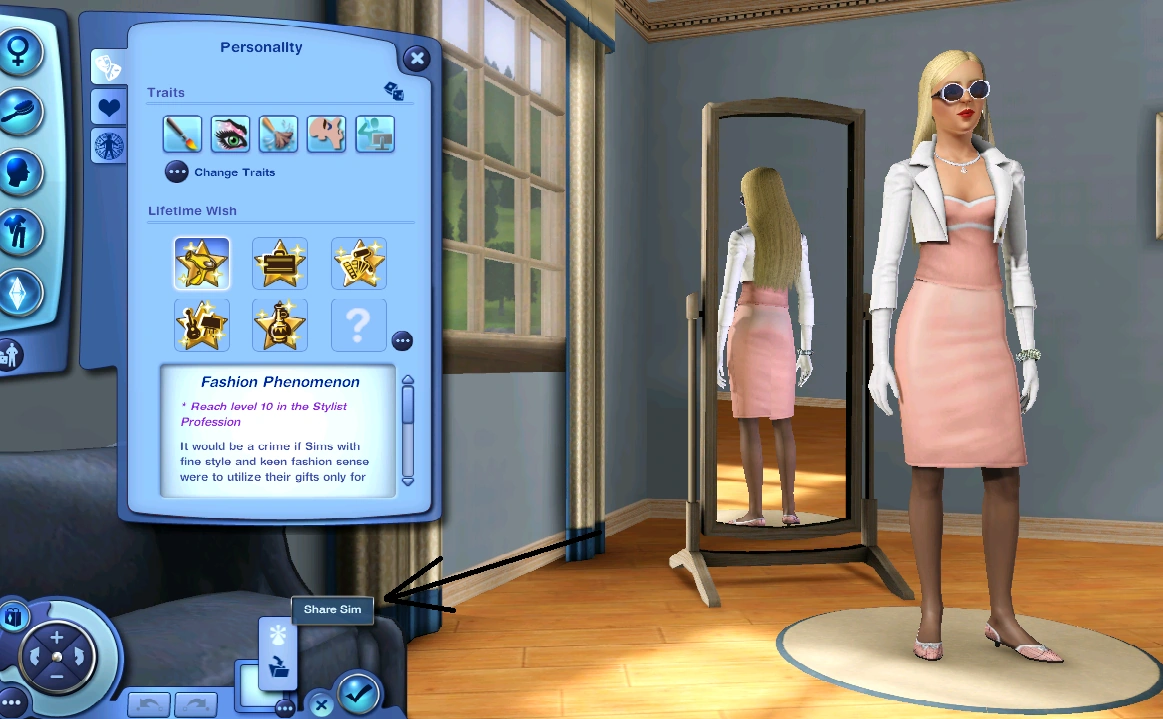

Look closely at this picture, at the bottom you will find that button and see the "Share Sim or Pet" action option. Click there and your Sim will be uploaded to your loader in a couple of seconds.
- Step Two
- Look for your Sim or Pet in the Uploads section and check the box next to their picture (make sure you are logged in). It will take a few seconds to be uploaded to your account on the account on the Sims 3 website, make sure your logged on there too.

If you can not find your Sim then try the process over again from the beginning or the site maybe on a maintenance schedule, it happens sometimes be patient.
- Step Three
- When that is all done you will have to log on to your account on the website (if you already did than good for you).
Hover at the top to the link saying "My Page" at go down to "My Studio", this is where you will find your headshot.
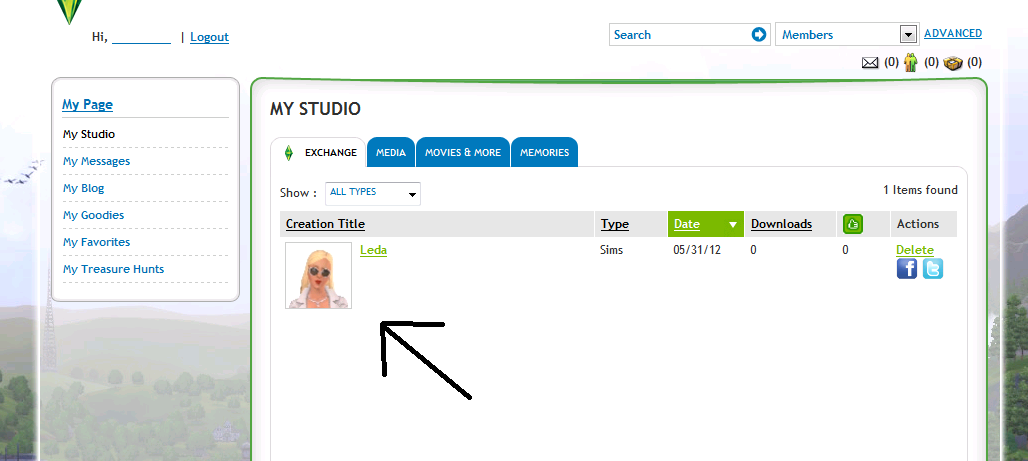

Now there it is! Only...it is a bit small and we want it a bit bigger. No matter, click on that small little headshot and it will follow on to the next page where it is bigger.
Right click on to that headshot and save it.
REMINDER!: When you save your picture, please do not save it with a generic name like "Screenshot" or with random numbers. Instead use your Sim's name, for example :"Headshot of Plumbbob Smith" or "Plumbbob Smith". The Sims Wiki does not allow generic file names to be uploaded.
- Step Four
- Now all that is done you can upload them to the wiki and place them on your Sim's page!
Remember to license your picture! It is located when you click the "More Options" link.
Happy Uploading!
Offline Method
Of course, for whatever reason you wish NOT to make an account with Sims 3, Fear not, there are other ways to extract the headshots.
- Step One
- Save the Sim, just as you would with the online method, with one exception: Instead of "Share Sim (or Pet)", press the "Save Sim (or Pet)".
- Step Two
- Run s3pe. s3pe can be downloaded here. Troubleshooting coming soon.
- Step Three
- When s3pe is opened, go to the File tab -> Open, and from there go to the directory Document -> Electronic Arts -> Sims 3 -> SavedSims. However, from there, it will display nothing, but by changing the "File of Type" option from "DBPF Packages" to "All files", you should be able to access the saved Sim. If you have named the sim before saving, the file should bear the sim's name.
- Step Four
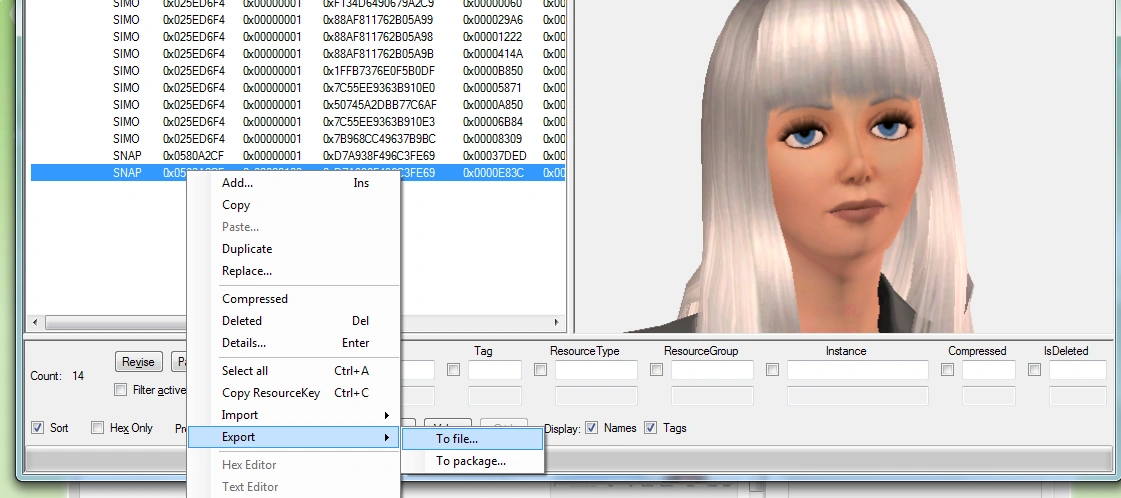
- Having opened the file, you will get a list of files. To find what you need, first sort the files by the tag name by clicking on the tag tab, which will sort it in alphabetical order. Scroll until you get to the SNAP tags, which will hold what you want.
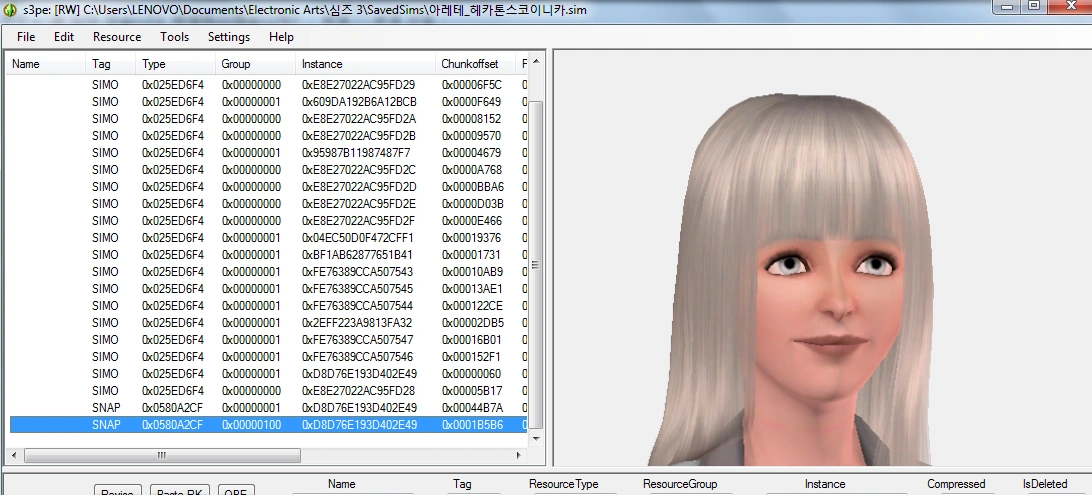
How it should look like: Notice the SNAP at the tag category.
- Step Five
- Once you have found the SNAP file that contains the headshot, right click on the item on the list, and then go Export -> To File. When saving, ENSURE to end the exported file with either a .png or .jpg: failure to do so will make the file inaccessible for immediate use.

- Step Six (If you have forgotten to add the extension)
- In the Win7, go to the Control Panel and select the Folder Option icon (if viewing Large Icon). Go to the View tab, and uncheck "Hide extensions for known file types," then rename your exported file by adding either .png or .jpg behind it.
- Step Seven (or Six)
- PROFIT!
How to take family pictures
- Step 1
- Open s3pe
- Step 2
- Access the Open menu. Then go to the Sims 3 folder, by default located at Documents -> Electronic Arts. Then open the Library folder.
The Sims 4 Headshots
Here is how you can get headshots for The Sims 4.
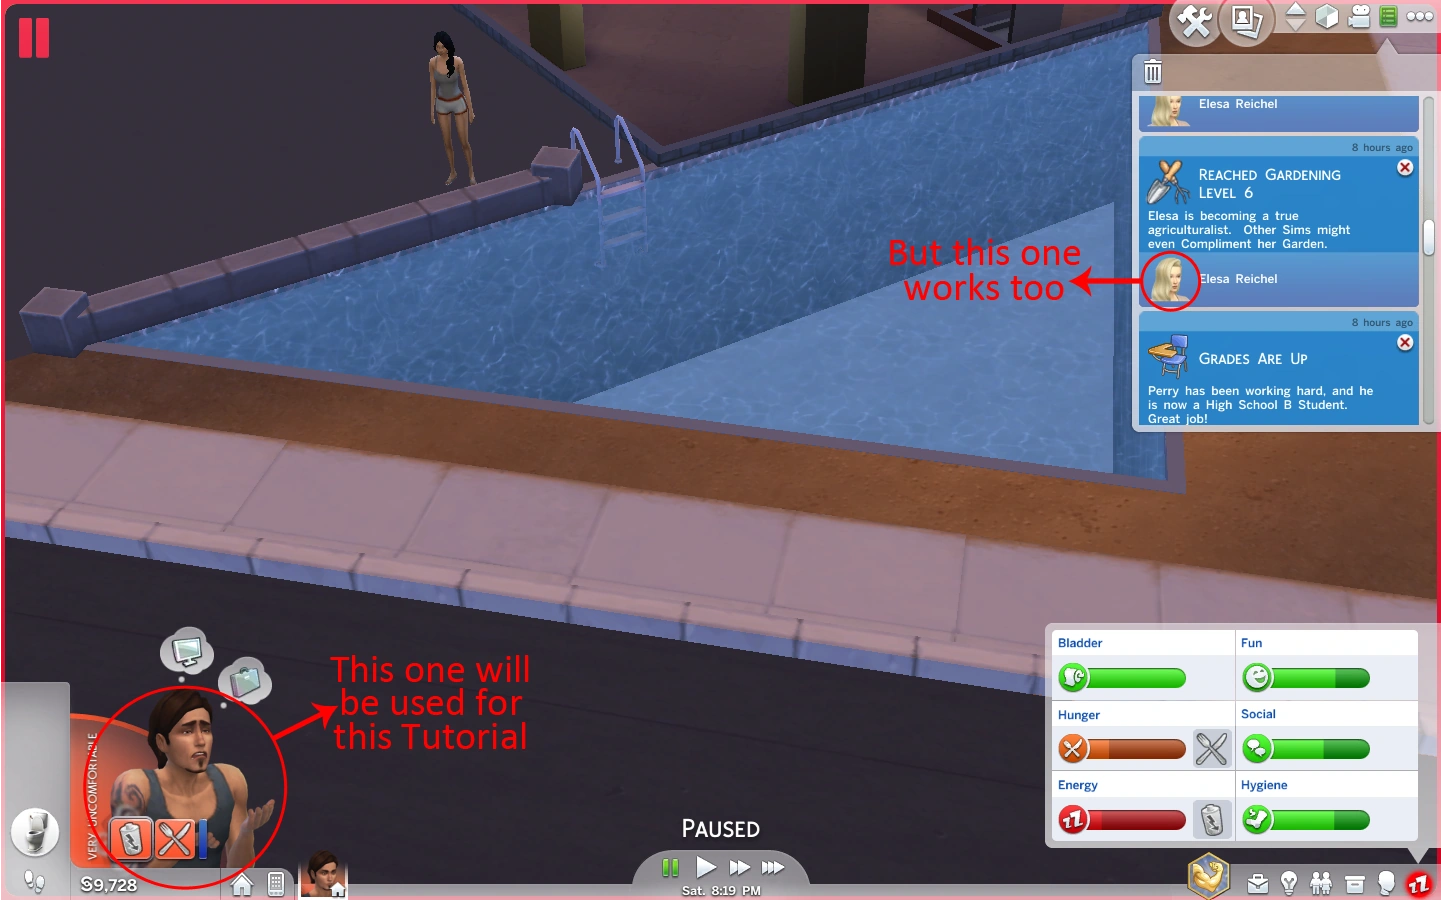
- In-game, make sure the game has generated the headshot of your Sim as desired, i.e. the Sim was played in the Fine emotion, or appears in the relationship panel of your played Sim. In this tutorial, however, we'll use the Sim in a Miserable (Very Uncomfortable) emotion.
- Step Two
- Run s4pe. s4pe can be downloaded here. Troubleshooting coming soon.
- Step Three
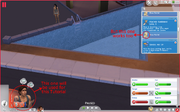
- When s4pe is opened, go to the File tab -> Open, and from there go to the directory Document -> Electronic Arts -> Sims 4 -> localthumbcache. This file saves all the thumbnails the game has generated, including, hopefully, the desired headshot.


The headshot as found in localthumbcache.

- Step Four
- Having opened the file, you will get a list of files. To find what you need, first sort the files by clicking on the instance tab, which will sort it in numerical order. Scroll until you find what you want.


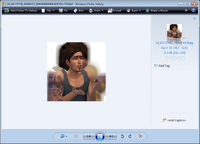
Note the blur surrounding the Sim. This may occur when exporting the file, yet not when copying the image.
- Step Five
- Once you have found the file that contains the headshot, right click on the item on the list, and then go Export -> To File. When saving, ENSURE to end the exported file with either a .png or .jpg: failure to do so will make the file inaccessible for immediate use.
It may happen that choosing Export -> To File will not get a quality image. If this happens, right click on the image itself and choose Copy. Now the image can be pasted into an image-editing program and saved normally.
- Enjoy your headshot!
- The same procedure can also be used to save family portraits and object thumbnails.
Optional: Making background of headshots black (or any non-transparent color)
This is only possible with headshots exported from s3pe and s4pe.
Exported headshots from s3pe has a transparent background. If you want to make the background of headshots black instead of white/transparent as seen on the wiki, it's possible by editing the image in question by using a image editing program such as GIMP.
This is also applicable for headshots exported through s4pe.

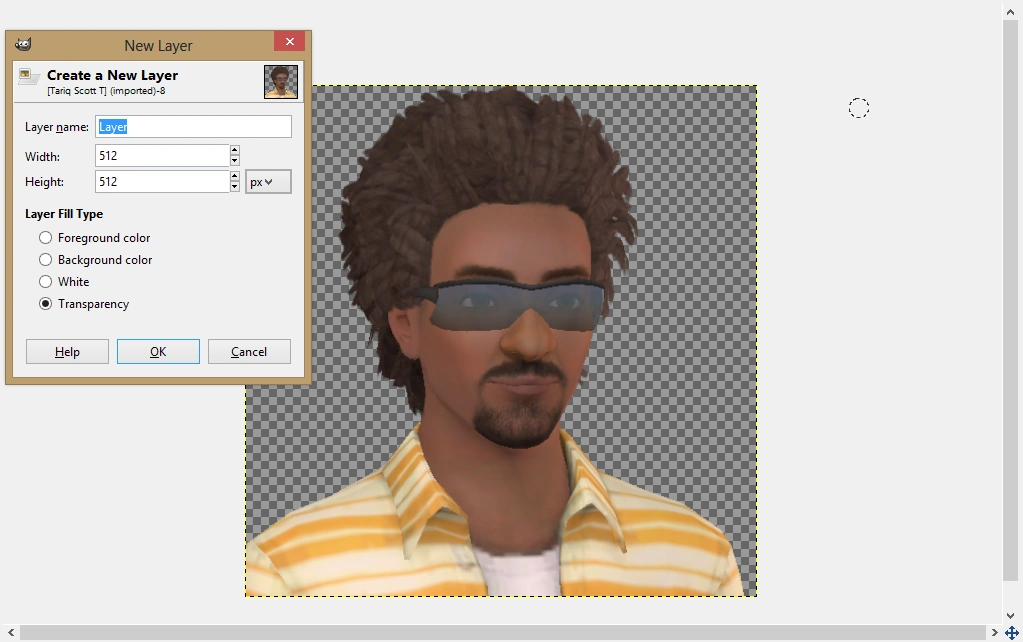
- Step 1
- Open the image in question in your favorite image editing program.
- Step 2
- Don't fill in the background just yet, because it won't look very nice. Instead, add a layer, and move the layer down so that it's below the background layer (the one that has the headshot).
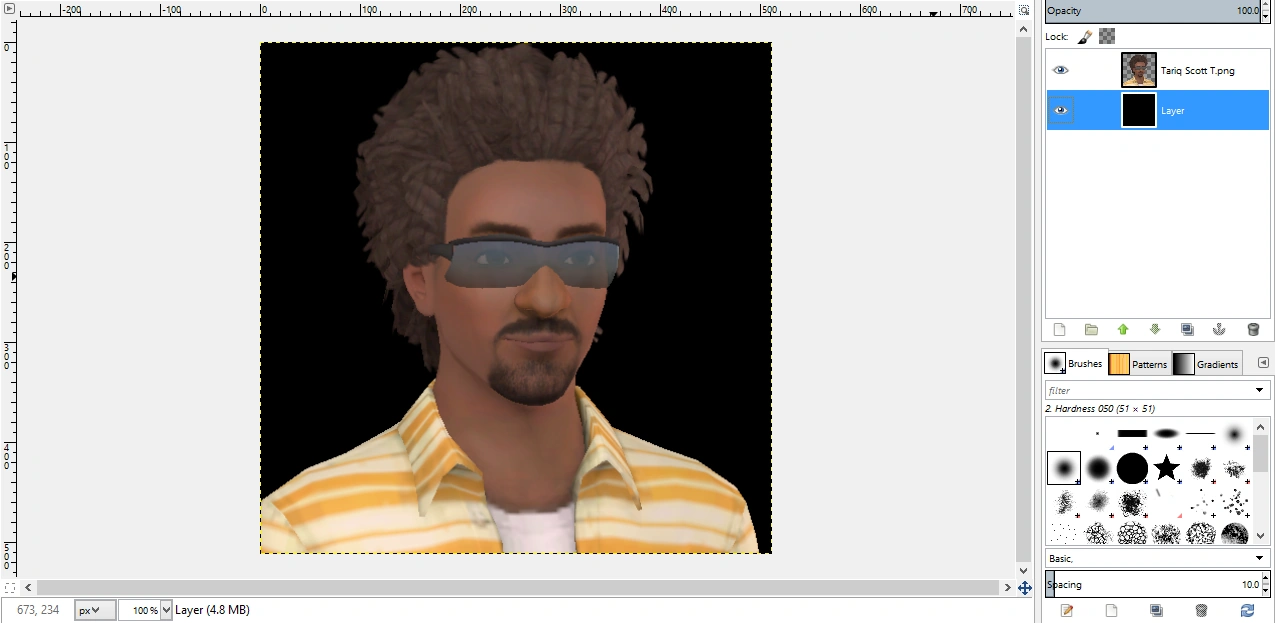
- Step 3
- Fill the layer you just moved (It's more preferable to use black if you're intending to upload it to the wiki, but you can use any color you want)


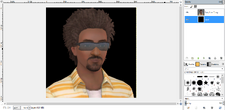
The finished result!
- Step 4
- Export the image and save as either .jpg or .png (if you intend to upload the headshot in question to the wiki, it's more preferable to select .png)
- Step 5
- Voila! Feel free to upload the headshot in question to the wiki, or perhaps use it for your own purposes...
